


So this post is a little bit different. I mentioned using Henna on my hair and have yet to post about my experience. I especially want to document for myself as a reference ....and I definitely need to do it while it is fresh on my mind. I am going to start with a little background on my natural hair journey.
When I was about 5 or 6 years old, my mom started perming my hair. I can remember getting it pressed a couple of times, but mostly remember getting that burning white stuff put on my scalp. I absolutely hated it. As I got older and was going to the hair salon, I watched our stylist (and wonderful family friend) as she did my mom's hair. I wanted to learn. I always knew that I needed to nurture my hair before it could look the way I wanted it to. With chemicals, a little extra care is needed...but all hair needs "special" care. By the 11th grade, our stylist moved to another state and I started doing my own hair. I learned quickly that cheap shampoos were no good. I had to persuade my parents that letting me spend money on decent hair products I was saving them money. '$60 for a hair product bundle that'd last me 3 months or so' vs '$30-40 per hair salon trip.' Of course, the product bundle won out. I loved experimenting with or without relaxers. I started blowing my hair straight and just wearing it big with a head band. My hair has been black, brown, red and blonde. All the colors in the world did not have me satisfied with my hair.
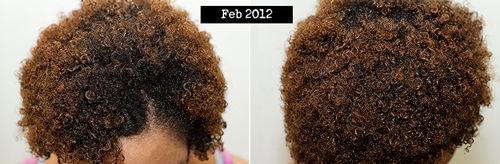
When I was pregnant with my daughter in 2007, I had not had a perm in about 2 months. I decided, no more chemicals. I continued to flat-iron, blow dry and roller set my hair if I was tired of twisting it. I started transitioning using the Organix shampoos and conditioners and using Elasta QP Mango Butter, Olive Oil, and Cantu Shea Butter leave-in to twist my hair. I flat-ironed my hair sometimes and had micro braids and twists. It was not until November 2011 that I was finally and completely free. I let my guy cut off the final permed ends. At first I did not want to because I did not know what to do with such short hair. I had at least 3 inches of length, so I kept doing the twist outs. They just got easier and easier and I started seeing how coily my hair was...and I fell in love. I have major scalp issues (seborrhoeic dermatitis) and since I have not used perms, I do not have that problem any more. Goodbye sore, raw scalp....good bye flaky forehead...I absolutely am happy I made this choice. Here are a few photos of my hair this year before my Henna experience:


==
Beginning with Henna
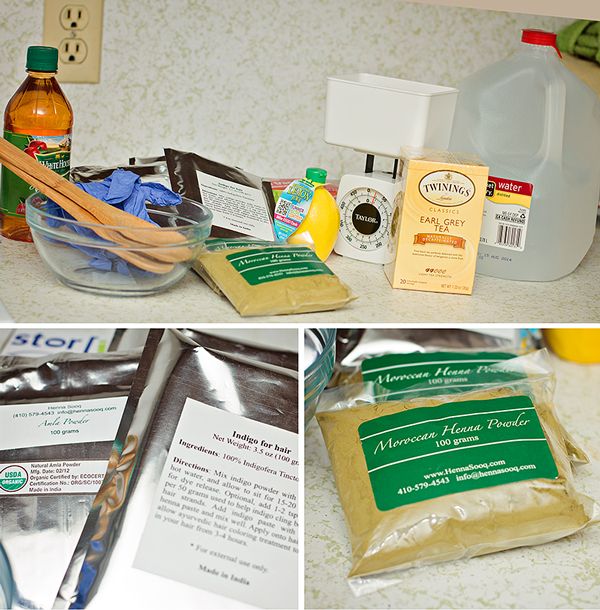
Normally, I would dye my hair with a permanent box color, but I wanted to stay completely natural not risk causing any damage to my hair or causing a change of my texture or curl pattern. I finally know what products I can and cannot use, so I just did not want to risk all of that just for color. That is when I started looking into the Henna process. I wanted my hair to be all one color and dark- as close to black as possible. All of the information that I found to help me in the process came from these 3 sites:
- http://www.hennaforhair.com/ - There is a section that shares valuable information about mixing henna for the color you desire.
- http://www.hennasooq.com/ - They have so many great articles here for beginner and this is also where I ordered the Moroccan henna powder, Indigo powder, and Amla powder.
- http://www.curlynikki.com/2012/03/two-step-henna-indigo-process.html - I followed her instructions and changed a few things according to the info I read- will explain later. :)
The first thing to keep in mind was that Henna is not like chemical hair dye. It does not lighten the hair. It will give your hair red or brown tones. In order to get black hair, I needed to use indigo (which is also derived from a plant, like henna). I decided to buy the Amla powder after reading that it will help your hair maintain its curly nature during the henna process. From what I read, Henna can stretch your curls. I wanted that but not to an extreme. Like I said, I like my hair as it is, so I added a teaspoon of Amla to my henna mix to help preserve my curl pattern.
Here are all of the supplies I used:
The Henna Application Process
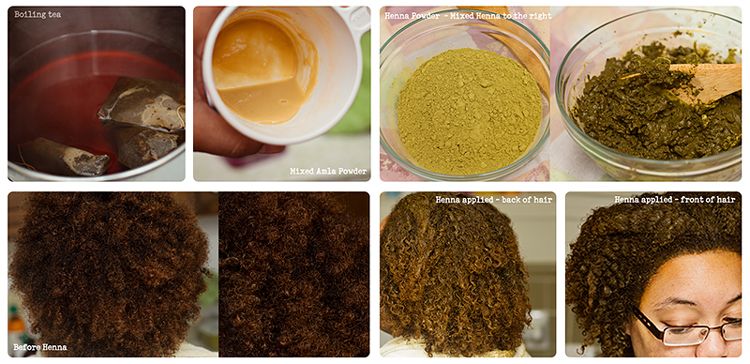
I used about a teaspoon of lemon juice and a teaspoon of apple cider vinegar along with 2.5 cups of black tea to mix 100 grams of henna. I cover the bowl with plastic wrap and placed it in a dark closet for 2 hours to let the dye release in the Moroccan Henna. Each type of Henna has a different dye release time. Moroccan henna has the shortest time and it is best to use when the end result desired is a darker color. While the henna was sitting, I folded some laundry and did a few scrapbooking page (insert big smile here...lol!) and then co-washed my hair with Aubrey Organics Honeysuckle Rose Moisturizing Conditioner and Lily of the Desert Aloe 80 Organics Daily Conditioner with Aloe Lemon and Rosemary. Quite a few of the articles and forum posters at Curly Nikki.com mentioned that henna can dry your hair out, even moreso if you decided to mix with lemon or vinegar. That is the reason why I chose to mix my henna with a small amount of those two items and use moisturizing conditioners to wash my hair. My hair is very porous, so after the 2 hours of waiting it was quite dry. I spritzed my hair with distilled water and my guy was a HUGE help and applied the henna all over my hair. He was very much against wearing purple gloves (lol!), but unless he wanted orange hands- it was in his best interest.
==
===
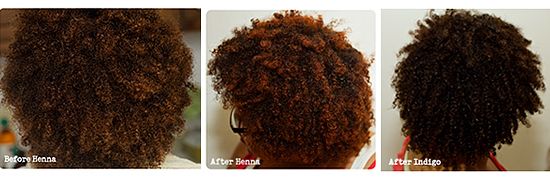
After the henna was applied, I smoothed it in just a bit more to make sure all of my edges were covered. I forgot to mention that right before we applied the henna to my hair, I added a teaspoon of coconut oil and the 2 conditioners I used to wash my hair. I covered my hair in plastic wrap and a plastic cap and let it stay for about 4- 4.5 hours on my hair. Then, I filled the tub with water and dipped my head in the water to loosen most of the henna. Several of the sources that I was reading from mentioned henna was hard to get out of your hair. I am not sure if the tub idea made it easier for me since according what I read, Moroccan henna is one of the easiest to rinse out...but I will say, it made it quicker. My hair was quite red after the Henna. I almost wanted to stop there because I will always LOVE red hair, but I am in a black hair kind of mood. The ends of my hair still have the permanent dye on them and they are much lighter than my roots, so it looks like my roots did not change but looking at it (in person- not in photos), I could tell they were a deep red shade.
after Henna
====
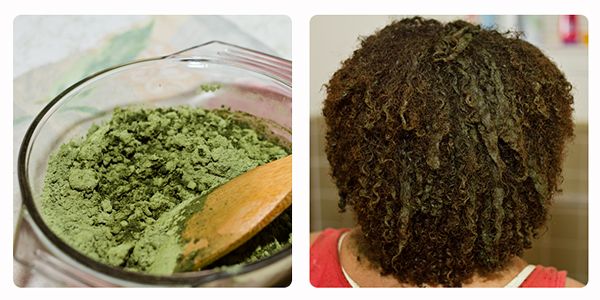
The Indigo Application Process
Directly after I washed out the henna with a small amount of conditioner, I prepared the indigo and immediately put it all over my hair. The indigo is VERY messy....very veryyy messy. lol! Let me go ahead and give that disclaimer. I mixed 100 grams of indigo with a pinch a salt and poured in the distilled water little by little. This needed to be a thick paste, so carefully adding the water was a must. The indigo has a dye release time of about 15 - 30 minutes; right after it was mixed, I immediately put it all over my hair with my gloved hands. I wanted 'some' of the red to show through, so I was not too concerned with a complete coverage from the indigo, especially on the ends of my hair.
==
===
I covered my head with a plastic cap again and let this stay for an hour. I took this time to clean up all of the mess. Indigo will stain, so be careful and be sure that the area you are applying it is well covered. Immediately cleaning the sink and the floor was a good idea, but I did miss a couple of drips. There are hints of bluish/purple stain on the bathroom counter (oops!). Indigo also has a very strong smell. The smell did not really bother me. It reminded me of spinach and arugula and grass...yes, grass that is outside in the yard. I have really bad allergies and when the indigo was on my skin it actually made me itch. My guy has asthma so he was having some issues; we had to keep the AC on and the windows open. We are pretty sensitive to smell so I don't know if anyone else had this issue. If they did, no one mentioned it. Because believe me when I say that one factor could have scared me from trying this. It was not unbearable and I will be doing this again in a month or so, but I just thought I would share that info since I did not see it anywhere.
===
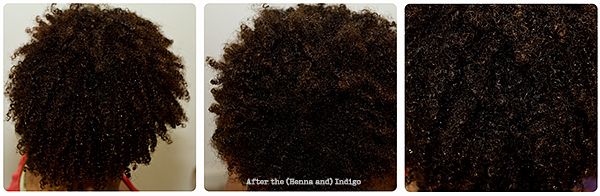
After the Indigo
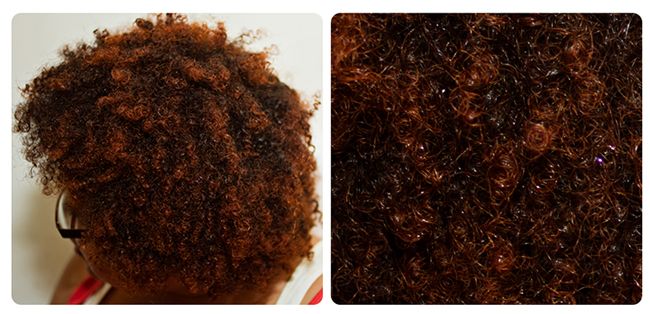
You cannot use indigo alone to get the hair black. Indigo dye is blue; it is used for dying denim (yes, your jeans...lol!); the henna and the indigo together will help you achieve black hair. After the hour was up, I rinsed the indigo with luke warm water. Once the water ran clear, I added a small amount of conditioner in my hands and washed my hair a little more. Here are the results:
===
===
Conclusion: Henna + Indigo (with/Amla and Black Tea)
I loved the results I got from this process. My hair did feel a little dry afterwards. That was expected but it was not as brittle as I thought it would be. Using the conditioners helped quite a bit and definitely helped to make this a pleasant experience. My natural hair color was very dull and now I have a bit if shine or gloss, or whatever you want to call it. My curls were even more curly after washing and I was just in awe of that. I look forward to the conditioning effects of henna and definitely the curl stretching. I will wear big hair all day...lol! Big hair and big attitude :) Let me stop. Really, this was very experimental, fun and a great learning experience. You have to wait about 2-3 days before actually washing your hair with shampoo after henna. The same night I finished I wore a wash-and-go and pinned the sides back to go to dinner and the next day I started mini twists (will speak on that another time), but I say if you are natural and choosing to be as natural as you can handle, definitely try the henna if you are thinking about it. The sites I listed above are wonderful resources and are where I read the bulk of the information. I printed articles from all 3 to follow while I was doing my hair. That was very helpful for me. I recommend getting all of your henna products from Henna Sooq. The online ordering process was very simple through their site and paypal, everything arrived in a timely manner and neatly labeled and packaged. I will be trying other henna powders, herbs and essential oils from them VERY soon. I still have some Amla to use up and another batch of henna and indigo in the refrigerator (unmixed & still packaged). Here are a few more after pics and I included a photo of my hair now in the mini twists:
===

===
I am not a professional, just a girl experimenting with her hair. If anyone has any suggestions, comments, questions, please feel free to share here or use the contact form to let me know! Thanks for visiting and I hope I was helpful in some way! :)

===
===
No comments:
Post a Comment
Express yourself here....